Cover Your Floors
Before you open your cans of paint and start rolling, you need to shield your floors from any accidental splattering that might occur while painting. Canvas drop cloths give you the best bang for your buck because they are durable and washable, so you can use them more than once. They are also made out of cotton so they soak up the paint, unlike plastic covers that are cheap but turn into a slippery nightmare when wet. Cotton cloths also become slippery when applied to hardwood floors but this can be remedied by placing a layer of resin paper under the canvas cloth and taping it to the floor. This creates a solid foundation for the canvas and allows you to walk around the room with ease. Professionals recommend vacuuming floors before you cover them with a protective layer so as to stop dust bunnies and debris from becoming trapped under the cloth and scratching the surface.
Go for High-Quality Tools
A swordsman simply cannot go into battle without a skillfully crafted sword by his side. The same concept applies to the painting, only there are no swords involved, just good old fashioned brushes and sandpaper. Pros invest in high-quality tools to make their jobs easier and to save money in the long run as well. You may be tempted to buy that trendy roller you saw on TV but when it comes to painting gear, you need to take the professional route and buy your supplies from reputable home improvement stores. Examples of quality tools include thick sheepskin roller covers for textured ceilings and drywall sanders made out of very fine grit paper for sanding walls.
Sand the Flaws Away
All flawless walls have one thing in common and that is careful and methodical sanding. You simply cannot have a smooth surface without prepping your walls and getting them ready for priming. Sanding is the magical airbrush that smooths out the uneven terrain of your walls. It removes rough patches found in trims and feathers out chipped paint too. If you want your trim to have that glossy finish then all you need to do is use a sanding sponge instead of sandpaper. The sponge is flexible enough to meld to the curves and cracks that you may encounter while sanding. Sanding done right involves prepping the walls from the baseboard to the ceiling using a fine grit sanding sheets attached to a pole sander. You can use the pole to sand horizontally along the baseboard and ceiling. Sandpaper also exists in liquid form and is mainly used to remove the glossy layer from walls. Using liquid sandpaper is ideal if you plan on adding a latex layer on top of alkyd paint later on. Sanding is also recommended after priming to remove any bumps or imperfections that can ruin the appearance of your walls. Finally, remember to use a light touch when sanding so you don’t have to patch things up with joint compound and re-sand that area again.
Prime Perfection
Behind every beautifully painted room is a primer whose main job is to provide a strong base for the paint while allowing it to be distributed evenly along the surface of the wall. Both alcohol and alkyd primers are top notch choices because they are versatile and can be used to prime more than just walls. Using a tinted primer is a great option if you have a room with dark colors that you want to transform into a bright area using sunnier shades of paint. This also works the other way around in case you want to add a touch of dark and earthy colors to your home. Using a tinted primer will save you the hassle of applying two or three coats to the wall, which means less money is being spent on buying paint. Professional usually tint the primer themselves by adding a small amount of paint to the primer and mixing them together.
Mend the Gaps
Prepping your walls does not end with sanding since you need to caulk your walls before painting them. Caulking involves filling in those unpleasant cracks that plague the surface. These cracks usually make an appearance once you finish priming your walls. To achieve a flawless finish, make sure to caulk all the joints that exist between the wall and trim. This process is good for insulation and prevents moisture from seeping into the walls. You will need two caulk tubes for your walls. One will be used to seal narrow cracks found between frame joints and window stops for example, while the second tube will be used to fill wider cracks. Wipe off any excess caulk using a damp synthetic sponge and give it enough time to dry out before painting the walls. Garage painting projects also involve mending cracks and in this case, you need an epoxy crack filler to fill those gaps before you apply the garage floor paint of your choice to the clean and primed surface.
Trim Takes Precedence Over Walls
Many professionals prefer painting the trim first because it is easier and you do not have to worry about splattering and ruining your walls. You can achieve better coverage by making long and straight strokes. Starting your journey from the trim also makes it easier to cut in the wall paint next to the trim if you are not using tape and even if you use tape, taping off the trim is less time consuming when compared to taping off the walls. For a smooth finish, make sure you sand the trim between coats. Thinking about painting the ceiling? Then make sure you do it before moving on to the trim and walls.
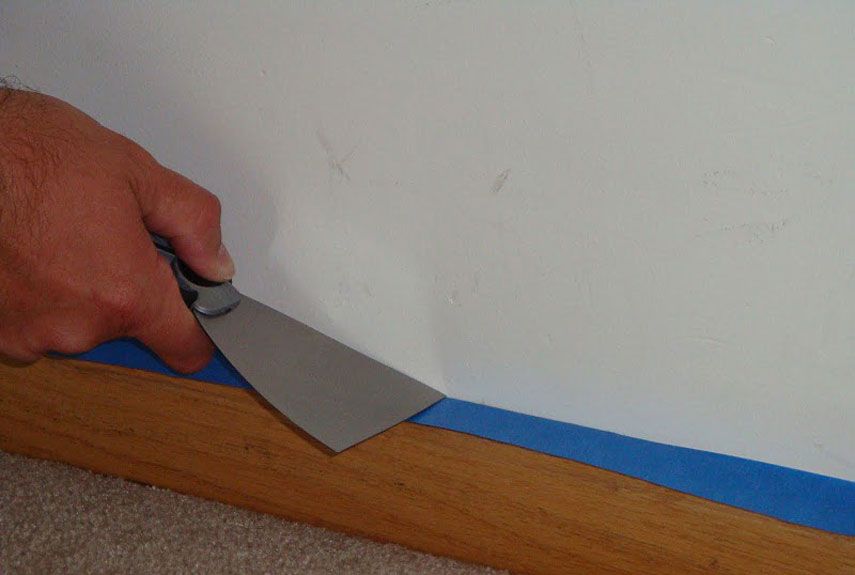
The Scoop on Masking Tape
Painters have their very own tape named after them and it comes in a vivid blue color that is ready to use on walls and canvases alike. Painter’s tape can get confused with ordinary masking tape that is cheaper yet problematic for a number of reasons.
First of all, masking tape can ruin your hard work if it forms air bubbles when you tape it to the wall. Those aforementioned air bubbles allow paint to escape its confines and bleed into masked off areas. Masking tape also leaves a sticky residue behind when you remove it. This residue will have to be cleaned off, which is a hassle to begin with, not to mention a waste of time. The time you could be spending prepping another room. In comparison, painter’s tape will give you a more sharp and professional line once you remove it, but you have to apply it correctly. So when it comes to taping the trim and baseboard, make sure you use a flexible putty knife to apply pressure to the edges. A flexible knife seals the edges properly and can be used on uneven surfaces for better tape application.
Prevent Lap Marks
These unwanted stripes leave their mark on your walls when both dry and wet paint overlap. This sometimes happens when you paint in direct sunlight or when you add a fresh coat of paint over partially dried walls. Direct sunlight means heat and this causes latex paint to harden in less than a minute. Additionally, using cheap paint that is high in solid pigments in another way you can end up with lap marks on your walls. Embracing the wet-to-dry technique will help give you a smooth and uniform finish. Professionals call it -maintaining a wet edge- and this can be done by painting an entire wall in one go. Make sure that each stroke of your roller overlaps the previous one to prevent the walls from drying out and avoid taking a coffee break mid-painting. In fact, plan your breaks at natural interruptions such as doors and windows.
Give Wool Blend Covers a Try
Choosing the right roller cover for your walls is very important, so splurging on a high-quality cover that will hold enough paint and give you a smooth finish should be your goal. That is why professionals recommend buying a ½ inch nap wool blend roller cover and taking it for a spin. Wool covers may be more expensive than synthetic covers but their fabric holds more paint without splattering. More paint means covering a larger surface area and this saves time if you have a big room on your hands. Shedding is a downside of wool but this problem can be easily solved by wrapping the new cover with masking tape and peeling it off to get rid of those pesky loose fibers. Remember to use a light touch when rolling and keep in mind that the best rollers are ones that need fewer trips from the wall to the paint tray during an average day of painting.
Woodwork Brush Techniques
The best way to take full advantage of your paintbrush is to load it up with paint and then apply a thick layer to different sections of the trim using short and quick brushstrokes. Once you are done with this step, you can go back to spreading the paint evenly using long strokes to cover more area. Make sure to work quickly for an even application and avoid using the brush to paint the edges of a trim or a doorframe because this can cause the paint to build up in that area and drip down to the floor or walls. Always brush towards the edge instead of making it your starting point.
Shop for an Extension Pole
Keep your feet on solid ground and let the extension pole do the work for you. Extension poles are a great alternative to stepladders and they can be adjusted to meet your needs in terms of wall height. Remember to look for a pole with a rigid metal core and a nonslip grip so your fingers can easily maneuver it while painting. Poles that can be extended up to 36 inches are usually ideal for rooms with 8 to 9-foot ceilings.
Save Your Paint Brush
Caring for your premium paint brushes will allow them to age better with time and this involves cleaning them and getting them ready for your next paint job. First, you need to wipe off any excess paint that might be stuck to the bristles before soaking them in soapy water. Use your hands and a brush comb to manually clean the brushes before employing the help of a brush spinner to remove any excess paint and water from the bristles. Brush spinners are a handy tool that professionals use to maintain the cleanliness of their brushes. After spinning your brush, rinse it off in a bucket filled with clean water and then wait for a few minutes before giving it another spin. Rinse it one last time with a fresh bucket of clean water before wrapping it with heavy paper. This step is crucial when it comes to preserving the shape of your bristles.
Replace the Tray with a Bucket Grid
Painting your house is a chance for you to try the bucket and grid combo. All you need is a five-gallon bucket and a grid to match. Grids are available in different sizes, so you need to check the size of your roller frame and buy your grid accordingly. The bucket and grid pairing allow you to save time and effort when painting, and the grid is a great way for you to remove excess paint from the roller for better and even wall application.
Tips for Cold Weather Painting
Painting your walls can be a headache during wintertime, so you need to stick to some guidelines that will help you achieve your goal. Keep in mind that drying time will be longer and the weather may affect the appearance of colors. The best thing you can do is check the temperature of any surface you wish to paint. Oil based paints can be applied when the temperature is 40° to 90° Fahrenheit, while latex needs 50° to 85°F for proper application. Check the label on your paint can before you begin and read the instructions carefully. The ideal time to paint in winter is between 10 am and 12 pm, so use the sunlight to your advantage when painting and make sure that you use a high-quality primer for a smooth finish.
Originally posted 2023-11-26 00:16:50.